
ABAP Web dynpro ALV report table
Here are the simple instruction of how to insert an ALV report table into your web dynpro for ABAP application. Implementing an interactive ALV report is a very simple process
but once added provides extensive functionality such as sorting, edit, printing, export to excel, various views of same data... It also allows the final user to manipulate the report to their liking by re-ordering
fields and even hiding some altogether!
Before following these steps you need to have created a Basic Web Dynpro, which will only take about 5mins as it does not need to do anything, all the one linked to here does
is display the text 'Helloworld'.
Once you have your basic web dynpro which contains a simply view, window and application you can follow the steps below to insert an ALV table into it.
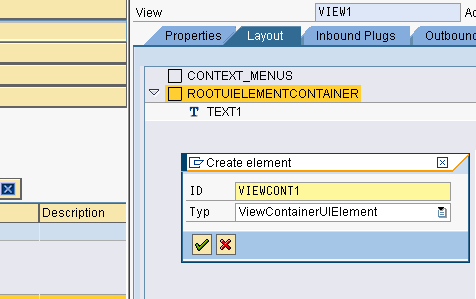
Step 1 - Create a View Container UIElement
Within the layout tab of your VIEW add a new element of type ViewContainerUIElement and give it a name, such as VIEWCONT1. This will be used to display
your ALV table.
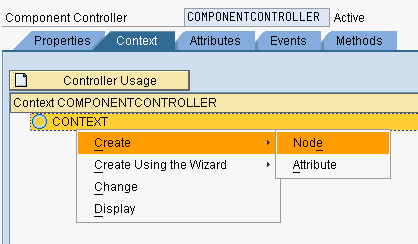
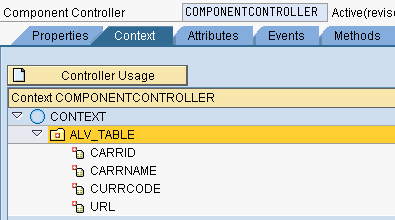
Step 2 - Create your context node
Now create your context which will be used to generate your ALV grid table. I.e. the fields in this context will make up the columns of your ALV table.
Double click on the ComponentController and select the 'Context' tab. Now add a new node to the context node (right click the context and select Create->Node).
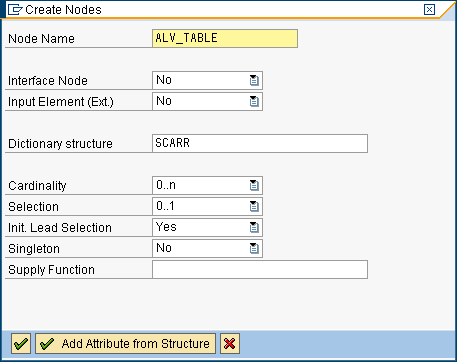
Step 2 - Populate properties of your context node
Give the new node a name and enter which table structure you want to base it on (i.e. structure you want your ALV grid based on ). Also rememeber to set the
cardinality to 0:n (or 1:n) to denote a table.
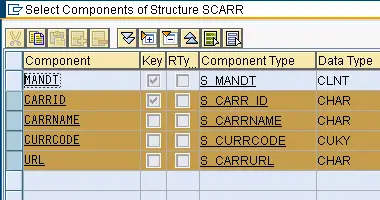
Step 3 - Add field attributes to your context node
Now click on the 'add attributes from structure' button, and select your desired table fields.
Step 4 - context node created!
Press the green tick on both the new popup screens to return to your context section, your new context node should now have been added.
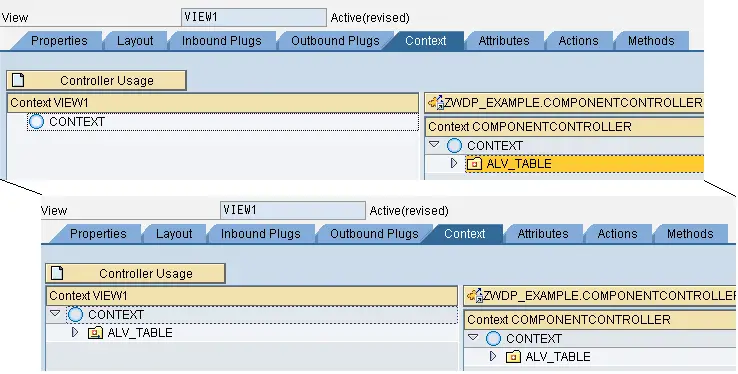
Step 5 - Populate Context used by ALV within VIEW
Go to the context tab of your VIEW and drag the ALV table context(ALV_TABLE) from the right hand side to the left hand conext node.
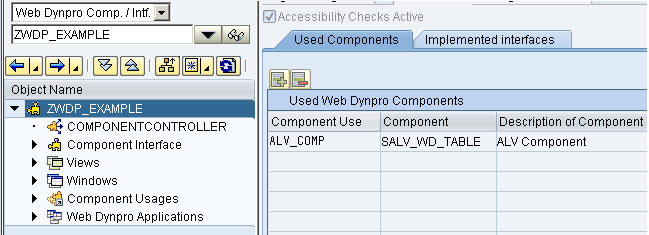
Step 6 - Assign ALV Component usage
Within the Used Components tab of the web dynpro main properties screen add a new component usage SALV_WD_TABLE and give it a
usage name of your choice (ALV_COMP).
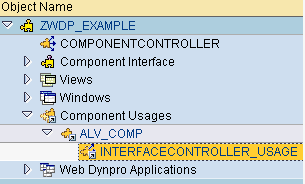
Step 7 - Access the Component usage
Within the left hand object tree expand Component Usages and then the usage you just created (ALV_COMP). Now
double click on INTERFACECONTROLLER_USAGE
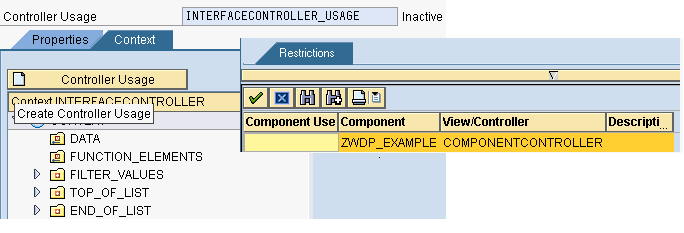
Step 8 - Assign controller usage to ALV usage
Click on the 'Controller Usage' button and select your web dynpro component
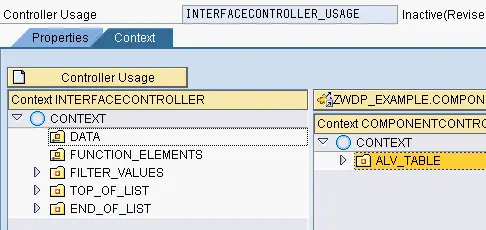
Step 9 - Assign context to ALV usage data
A second context view will open on the right hand side containing the context node you created earlier
for your ALV table. Simply drag this node from the right hand side to the left hand side DATA node.
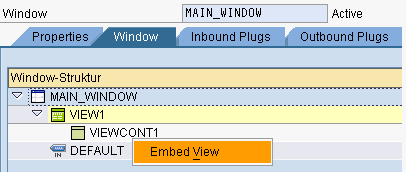
Step 10 - Embed the ALV into VIEW Container
Go to your main window where the view (VIEW1) has been embeded. Expand the view until you reach the VIEW Container
VIEWCONT1. Now right click on the View Container and select 'Embed View'
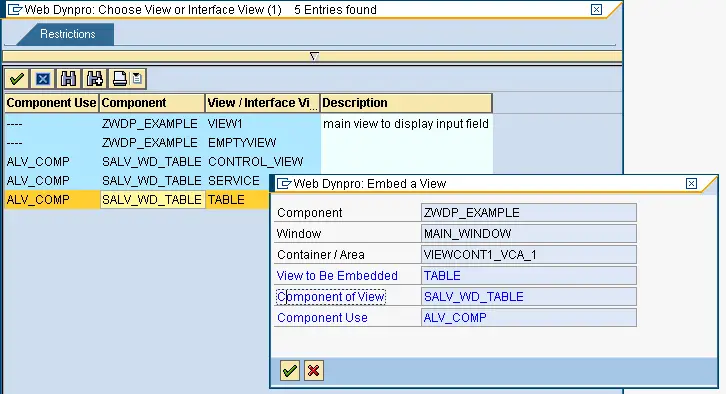
Step 11 - choose view to embed
Click the drop down option of the 'View to Be Embedded' field and select the TABLE view of your ALV component usage (ALV_COMP).
Step 12 - Add ABAP code to populate ALV table
Within the WDDOINTINIT method of your VIEW (VIEW1) enter the following code.
* create local data variable to access context information
  Data: context_node type ref to if_wd_context_node.
* create table based on context structure
  data: it_scarr type STANDARD TABLE OF if_view1=>element_ALV_TABLE,
        wa_scarr like line of it_scarr.
*select data from required SAP table
  select *
    from scarr
    into table it_scarr.
* bind data to context used by ALV
  context_node = wd_context->get_child_node( name = 'ALV_TABLE').
  context_node->BIND_table( it_scarr ).
Step 13 - All done!
Well thats it your all done, simply save and activate everything and execute the application. you should see something like the following...
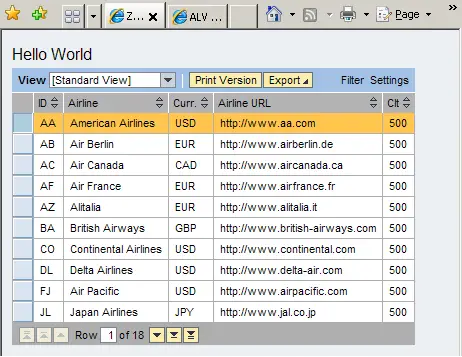
Step 14 - Populate Context used by ALV within VIEW
Note: You will notice that client is displayed within the ALAV even though you did not select the client field during the context creation stage.
This is just to demonstrate that all fields from the route structure are brought through to the ALV despite how many you actually choose.
If you dont want certain fields to appear you can create a structure which does not contain them or insert some code to
hide fields of the web dynpro ALV you do not want to see.
Check out web dynpro ALV select options if you want to add user selection to your ALV report.
This allows the user to resrict the output results based on select option input fields.
Related Articles
BIND_STRUCTURE method of interface IF_WD_CONTEXT_NODE to assign structure to context
BIND_TABLE method of interface IF_WD_CONTEXT_NODE
Get the name of the button the user has clicked on within the SAP web dynpro action ABAP code
Create field Refering to datatype of webDynpro context element
WebDynpro context for creation of screen field including standard search help
Disable SAP User Personalisation in Web Dynpro app using WDDISABLEUSERPERSONALIZATION and WDENABLEUIELEMENTSHIDE
GET_ATTRIBUTE method of interface IF_WD_CONTEXT_NODE to retrieve value of context element
GET_SELECTED_ELEMENTS to get selected row of ABAP web dynpro table when not using lead selection
GET_STATIC_ATTRIBUTE_TABLE method to return all rows of a context table node
IF_WD_CONTEXT_NODE interface methods withn ABAP Web Dynpro to enable users to view and change data
ABAP code to manually trigger ABAP web dynpro plug
Popuate SAP WebDynpro field
Freely Programmed search help for your web dynpro application (custom value help/OVS)
Change the stylesheet theme used by your web dynpro and portal apps (i.e. SAP_TRADESHOW, SAP_CORBU)
Change the stylesheet theme used by your web dynpro and portal apps (i.e. SAP_TRADESHOW, SAP_CORBU)
SET_ATTRIBUTE method of interface IF_WD_CONTEXT_NODE to assign value to individuale context attribute
Clear context attribute using SET_ATTRIBUTE_NULL method of interface IF_WD_CONTEXT_NODE
Add Dropdown by index UI Element to table field within abap web dynpro
Add freely Programmed search help to a web dynpro application field
Retrieve SAP webDynpro field value entered by user
Hide fields of a web dynpro ALV table
Display web dynpro ALV report select options to resict output results
Assign value to ABAP web dynpro context via table, structure or individual attribute
Get selected ABAP Web dynpro dropdown byindex value (dropdownbyindex UI element)
ABAP web dynpro Dropdown by index UI Element allows a field to display a drop down list of values
ABAP web dynpro Dropdown default value, allow you to set current value of dropdown UI element
Change SAP web dynpro logon screen
Read ABAP Web dynpro table context on action / button click
ABAP Web Dynpro tables to allow users to view and change data
Get selected row of ABAP web dynpro table
Get all selected rows of table within your web dynpro for ABAP applications using GET_SELECTED_ELEMENTS
Get selected row of ABAP web dynpro table
ABAP Web Dynpro tree structure, display HR org structure as example
SAP ABAP Web Dynpro UI elements
View Container UI Element to display a web dynpro view within a wdp view
ALV ABAP Web Dynpro application
ABAP Web dynpro button click / Action
Call URL from SAP Webdynpro for ABAP ACTION
Call URL from SAP Webdynpro for ABAP ACTION
Display popup screen within ABAP Web dynpro
ABAP Web dynpro populate table on action / button click
ABAP code to Print abap web dynpro table
Adding URL parameters to you ABAP webdynpro to change thinks like the CSS